Hello everybody, it’s John, welcome to our recipe page. Today, I’m gonna show you how to make a distinctive dish, milky cream swiss rolls. It is one of my favorites. For mine, I will make it a little bit tasty. This will be really delicious.
Hello everyone Welcome to Mum'sSweet& ChatpatiRecipes! My Channel is about cooking tasty foods at home of my original recipes & they are very easy to. We also show videos about the famous Ice Cream Rolls from Thailand and we present you Do It Yourself tutorials to make homemade Ice Cream Rolls.
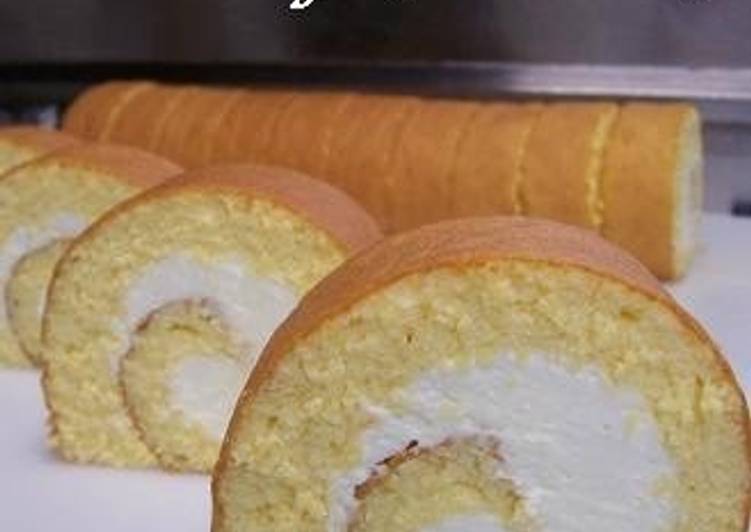
Milky Cream Swiss Rolls is one of the most favored of current trending meals on earth. It’s enjoyed by millions every day. It is simple, it is quick, it tastes delicious. Milky Cream Swiss Rolls is something that I’ve loved my entire life. They are fine and they look wonderful.
To begin with this particular recipe, we must first prepare a few components. You can cook milky cream swiss rolls using 11 ingredients and 23 steps. Here is how you cook that.
The ingredients needed to make Milky Cream Swiss Rolls:
- Make ready Sponge Cake
- Get 5 Eggs
- Get 100 grams Sugar
- Take 80 grams Cake flour
- Take Cream Filling
- Make ready 200 ml Heavy cream
- Make ready 50 grams Condensed milk
- Get Sponge cake for 27 - 30 cm square baking tray
- Take 4 Eggs
- Make ready 80 grams Sugar
- Take 65 grams Cake flour
Tag @sallysbakeblog on Instagram and hashtag it #sallysbakingaddiction. The top countries of suppliers are China, Japan, and Vietnam. Chinese swiss rolls are the lighter, Asian-style variation on a more traditional swiss roll. This easy swiss roll recipe is our take on this Chinese bakery You may have seen these light-as-air Chinese swiss rolls in a Chinese bakery near you.
Steps to make Milky Cream Swiss Rolls:
- [For 3 Eggs] 3 Eggs, 60 g of sugar, 50 g of cake flour [For 4 Eggs] 4 Eggs, 80 g of sugar, 65 g of cake flour
- Lightly beat the eggs in a large bowl, then add sugar and whisk immediately. Preheat oven to 180℃. Eggs should weigh about 250g without the shells.
- Using a double boiler, beat the eggs until the temperature gets to be about 40℃, taking care not to cook the eggs. I warm the eggs directly over the stove, but if it is your first time, I recommend using a double boiler.
- Remove the eggs from the double boiler when the bowl is warm to the touch, around 40℃. Whip the eggs using a hand mixer on high speed.
- Gradually, the eggs will become fluffy and become foamy. Continue to whip with the hand mixer on high speed until you can see the trace of the mixer on the surface. Beat on low speed for the 30 more seconds!
- Remove the hand mixer, sift the cake flour lightly onto the surface of the mixture.
- Using a rubber spatula or a wooden spoon, mix the batter in a circular motion (pink line) while rotating the bowl in the opposite direction (yellow line).
- After about 30 strokes the flour will have been incorporated, but if you stop here the cake will have a rough and dry texture, so keep mixing….
- It is best to keep mixing until the batter becomes glossy! Be careful not to overdo it as it will make the cake too rubbery!
- Pour the contents of Step 8 onto a cake pan lined with parchment paper. Bake the cake in a 180℃ preheated oven for about 12 minutes while keeping a close eye on the color.
- When the color turns golden brown it should be OK, but if you are unsure, insert a toothpick and check if it comes out clean! Place the cake on a wire rack to cool.
- When you place the golden brown side on the bottom it could stick to the paper and remove the nicely browned top. When cooling the cake do not put any paper on top and once cool roll the cake immediately!
- While the cake is cooling, make the cream. Weigh the condensed milk in a large bowl.
- Add the heavy cream into the bowl, whisk the bottom lightly then whip.
- Place the bowl in an ice-water bath if the room is warm.
- Whip until the cream no longer drops when the mixer is lifted. ※Go easy and do not over-beat, as the cream might separate…
- Lay the cooled cake from Step 10 on a new parchment paper upside down. Spread the whipped cream more towards the front and less towards the back. You may choose whichever side faces out.
- Lift the front portion of the cake, parchment paper and all, and start rolling. Press down on the first portion so that it sticks.
- Hold the parchment paper and roll the rest of the way at once. Make sure to have the seam of the roll at the bottom of the cake.
- The cake will set and will be easier to cut if you cool it in the refrigerator, but I like the freshly made cake as well because the cake itself and the cream are still fluffy.
- Even out any cream that sticks out from both sides.
- To cut the cake, immerse the knife in hot water each time and slice the cake without using too much pressure, using a back and forth motion. Use a bread knife if you have one!
- If you prefer more cream, increase the portion of the heavy cream and condensed milk by 1.5 times.
Set of hand drawn croissants with colorful watercolor splashes. Sweets and desserts solid icons pack is here having outstanding visuals. Rolling a Swiss roll is all about taking your time and being careful but firm with your cake. You'll want to make sure the filling is spread as evening as possible so A Swiss roll is often the perfect option, sliced with a cuppa. A sweet roulade is traditionally served as a dessert with plenty of cream and fruit.
So that’s going to wrap it up with this special food milky cream swiss rolls recipe. Thank you very much for reading. I’m confident that you will make this at home. There is gonna be more interesting food in home recipes coming up. Remember to save this page in your browser, and share it to your family, colleague and friends. Thank you for reading. Go on get cooking!