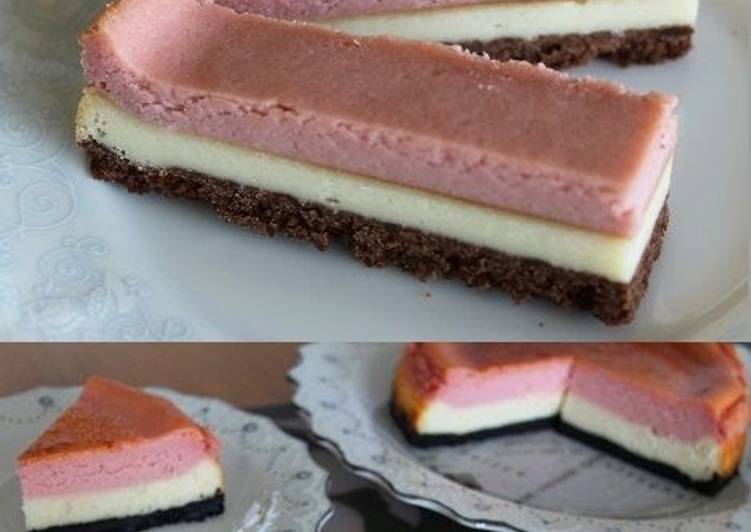
Hello everybody, it’s John, welcome to my recipe page. Today, I will show you a way to make a distinctive dish, baked strawberry cheesecake bar. One of my favorites. This time, I will make it a bit unique. This is gonna smell and look delicious.
Baked Strawberry Cheesecake Bar is one of the most popular of recent trending meals in the world. It’s enjoyed by millions daily. It’s easy, it is fast, it tastes yummy. Baked Strawberry Cheesecake Bar is something which I’ve loved my whole life. They are fine and they look wonderful.
To get started with this particular recipe, we have to prepare a few ingredients. You can have baked strawberry cheesecake bar using 18 ingredients and 25 steps. Here is how you can achieve that.
The ingredients needed to make Baked Strawberry Cheesecake Bar:
- Get Bottom
- Prepare 40 grams Oreo Cookies etc. (or any chocolate cookies)
- Get 20 grams Butter (unsalted or cultured unsalted)
- Get Strawberry Puree (you can also use store-bought)
- Take 50 grams Pureed strawberries
- Get 10 grams Granulated sugar
- Take 1 tsp Lemon juice
- Prepare 10 grams White Chocolate
- Get 4 drops Strawberry Essence (if you have it)
- Take Filling
- Prepare 90 grams Cream cheese
- Take 30 grams Granulated sugar
- Get 30 grams Egg
- Make ready 10 grams Condensed milk
- Get 50 grams Heavy cream
- Make ready 10 grams Soft flour
- Take 1 tsp Lemon juice
- Take 1 dash Food Coloring (whatever you like)
Steps to make Baked Strawberry Cheesecake Bar:
- Take the cream cheese and egg out of the refrigerator so that come to room temperature. Melt butter in the microwave and set aside. Place the Oreos in a Ziplock bag and break into fine pieces. Set aside.
- MIx the Oreos and melted butter from Step 1 and set aside. Line the poundcake pan with baking paper and add the Oreo mixture. Smooth out and chill in the refrigerator.
- If you press down hard with a plastic-wrapped kamaboko board, the crust will be firmly flattened even in the corners.
- Hull the strawberries and crush with a fork or a blender. Microwave unwrapped for 1 minute (600W). When it cools down slightly, microwave for another minute.
- In order to cook down to 50 g, (thickened is best), strain a total of 15 g and add sugar and lemon juice.
- To cook down from 30 g to 15 g of ready-made puree, microwave to evaporate the water (about 1 minute). While it's hot, add sugar and lemon juice.
- Add white chocolate to Step 5 and heat in a hot water bath. Preheat the oven to 355°F/180°C. Beat the egg well.
- Make the filling. Mix the cream cheese well with a whisk. When mixed, add the ingredients in the list in order from top to bottom, mixing well after each ingredient.
- Pour about half + 10g (total 115g) of the batter from Step 8 into the pan. Tap to get rid of excess air. Bake at 180°C for 15 minutes. If it darkens a little bit, it's okay.
- Add the mixture that was heating in the water bath from Step 7 to the remaining batter and mix well. Add vanilla extract and mix well.
- When you bake the cake, the pink color becomes a little dull. I add a tiny amount of red food coloring (just the powder) and whisk well.
- After Step 9 has baked for 15 minutes, add the mixture from Step 11 on top while tapping the bowl and pouring smoothly.
- Once again, place in the oven. Reduce the temperature to 170°C and bake for 25-30 minutes. The first 10 minutes is for excess water to evaporate, so leave the cake as is, in the middle of baking, and cover with aluminum foil.
- It's finished. It should be baked through, but if you are worried, use a bamboo skewer etc. to check. Leave in the pan and place in the refrigerator to cool (more than 6 hours.)
- Cut into 6 slices. The edges of the cake rise more so I sliced it horizontally into 4 bars.
- I used 5 pieces of individually wrapped "Kiri" cream cheese. Using 4 pieces + 30g sugarless yogurt is also refreshing and delicious.
- To double the recipe, use an 18cm square dish. If you don't cover with foil, it becomes this dark. It has a pretty 3 layer filling.
- I doubled the recipe in a 15cm round pan. I did not cover with aluminum foil. In the process in Step 9, first pour and bake 230g. After that, follow the same procedure.
- It's easy and delicious to make the puree with fresh, ripe strawberries. It's expensive to buy, too. Hulling 2 packs gives a total of 600g.
- Put strawberries in the blender, add about 10% of the 60g of sugar, simmer for about 30 minutes. It's down when it reduces to 50-60% of its original amount. Strain and it's done.
- When you use homemade puree, the thickness should be the same as in Step 5, (It will be a thick, deep red) and is very delicious.
- Here is a postscript. I recommend the red food coloring on the left, which you can pick up anywhere. The "Gaban" brand on the right did not color well, even with a lot.
- If you're lazy, you can add flour all at the same time, but add a little water to dissolve.
- It's harder than you think to get a pretty color but before baking, if the color is extra deep, it will become a pretty pink when finished.
- Sister Recipe: Matcha Cheesecake Bar. Chocolate Cheesecake Bar. - - https://cookpad.com/us/recipes/156194-baked-chocolate-cheesecake-bars - https://cookpad.com/us/recipes/152414-baked-matcha-cheesecake-bars
So that’s going to wrap it up for this exceptional food baked strawberry cheesecake bar recipe. Thanks so much for reading. I am confident that you can make this at home. There is gonna be interesting food at home recipes coming up. Remember to save this page on your browser, and share it to your loved ones, colleague and friends. Thank you for reading. Go on get cooking!